github
https://docs.github.com/cn/authentication/connecting-to-github-with-ssh
创建公私钥
# 根据自己的github邮箱创建公公私钥,一路回车即可
[root@101 app]# ssh-keygen -t rsa -b 4096 -C "62yanghuisheng@163.com"
Generating public/private rsa key pair.
Enter file in which to save the key (/root/.ssh/id_rsa):
Enter passphrase (empty for no passphrase):
Enter same passphrase again:
Your identification has been saved in /root/.ssh/id_rsa.
Your public key has been saved in /root/.ssh/id_rsa.pub.
The key fingerprint is:
SHA256:eJ4WHeMfMJyEmLdzCXLA0inHPSzh4qlTGLd2EEl4ne0 62yanghuisheng@163.com
The key's randomart image is:
+---[RSA 4096]----+
|   oo*o@ ..      |
|  . =o& Xo .     |
|  ..++.* +B.     |
|   = = .Eoo=     |
|  . * o Soo .    |
|   + . o o . .   |
|  o     +   .    |
|   .   .         |
|                 |
+----[SHA256]-----+
[root@101 app]#
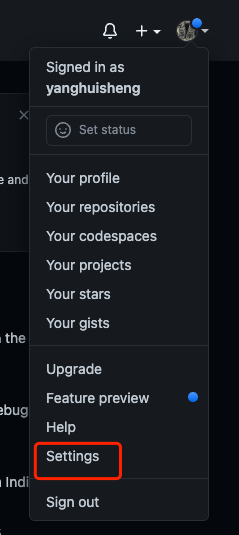
点击github页面左上角头像附近的倒三角,进入Settings,然后点击左边菜单的SSH and GPG keys,进入SSH key的设置页面


上面生成公私钥的时候,显示了公私钥的路径
# 私钥
Your identification has been saved in /root/.ssh/id_rsa.
# 公钥
Your public key has been saved in /root/.ssh/id_rsa.pub.
执行命令,获取公钥,粘贴到key这一栏中,title可以描述这个key的作用
cat /root/.ssh/id_rsa.pub
然后点击Add SSH key将SSH key添加进去
gitee
https://gitee.com/help/articles/4191#article-header0
点击Gitee页面右上角头像,进入设置页面,查看邮箱管理中的提交邮箱,生成公钥的方式与github一致,但是邮箱需要使用这里的提交邮箱,从左侧菜单进入SSH公钥页面,将公钥写入


gitlab
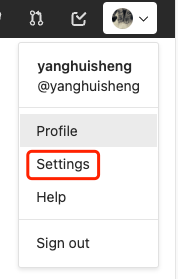
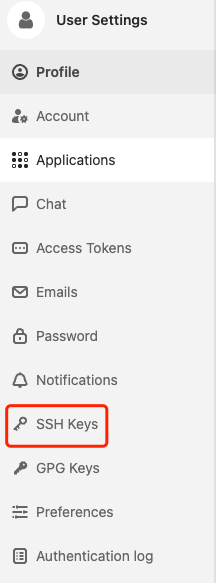
点击gitlab页面左上角的头像,选择Settings,然后从左边菜单的SSH keys进入配置页面,生成公钥的方式与github相同


本地配置多个SSH Key
如果我们在工作中使用的是gitlab,同时又有自己的gitee或者github项目,这事需要在本地同时配置多个SSH key,以方便我们的代码提交和更新。
首先,生成公私钥的时候,需要指定生成的私钥的名称。
生成github的公私钥
ssh-keygen -t rsa -b 4096 -C "62yanghuisheng@163.com" -f ~/.ssh/id_rsa_github
生成gitee的公私钥匙
ssh-keygen -t rsa -b 4096 -C "62yanghuisheng@163.com" -f ~/.ssh/id_rsa_gitee
查看~/.ssh下是否有config文件,如果没有则创建一个
host gitee.com
     Hostname gitee.com
     User yanghuisheng
     IdentityFile ~/.ssh/id_rsa_gitee
host 10.10.200.204
     Hostname 10.10.200.204
     User yanghuisheng
     IdentityFile ~/.ssh/id_rsa
host github.com
     Hostname github.com
     User yanghuisheng
     IdentityFile ~/.ssh/id_rsa_github

# Host : Host可以看作是一个你要识别的模式,对识别的模式,进行配置对应的的主机名和ssh文件
# HostName : 要登录主机的主机名
# User : 登录名
# IdentityFile : 指明上面User对应的identityFile路径